
I know that I had promised changing the layout of the levels and maybe specifically placing more blocks to put up more of a challenge in the game, but I think that it is fine just the way it is. So, for this week I am just going to work on my final project paper, the presentation, and the video before next Monday. Again, I am really happy on how this game turned out and really enjoyed working on this project. Some parts were frustrating to understand, but thanks to all the resources I referenced in helping me on this project, it all worked out just fine.
Week 11 of Capstone Project
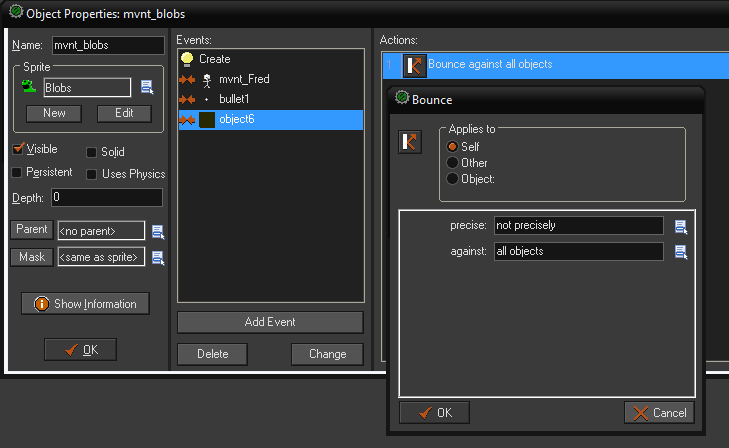
This week I worked on more movements for my other enemies: the blob and the boulder, plugging the sound into the game along with creating the events for starting and stopping it at specific areas, a restart game option once the game is over, and newly created rooms. I did the exact same procedure as last week for the movements of the other two enemies only in different directions. Again, I had to place blocks in the correct placement for these enemies to bounce off of and to prevent them from scrolling off the game. Here are the steps I have taken in picture format that describes the development of there functionality:
1.) The Blob’s directional movement that is fixed.

2.) Their collision event with the main character.
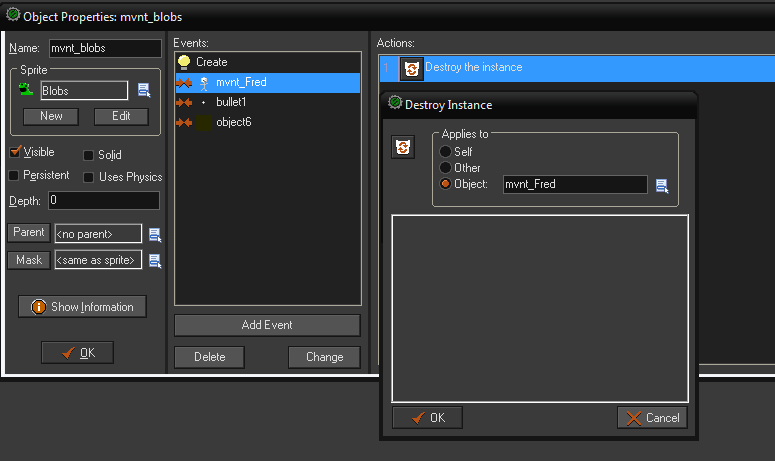
3.) Collision event with a bullet.

4.) Collision event with a wall.
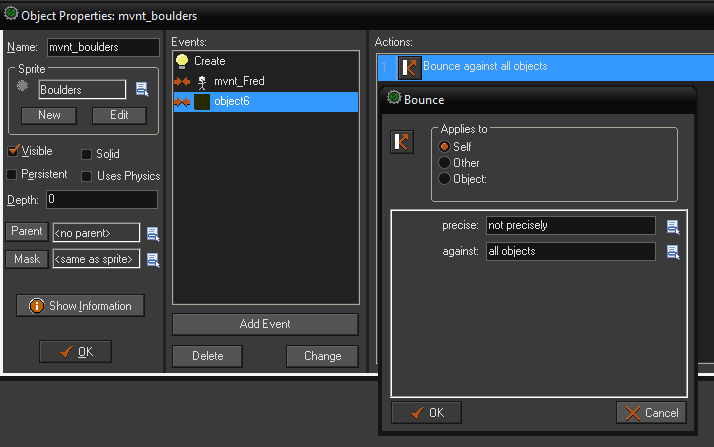
The only difference with the blob events and the boulder events is that the boulder will not be destroyed when the bullet comes into contact with it. Here is how I performed the events in the boulder properties in picture form as well.
1.) Boulder movement.

2.) Collision with Fred.
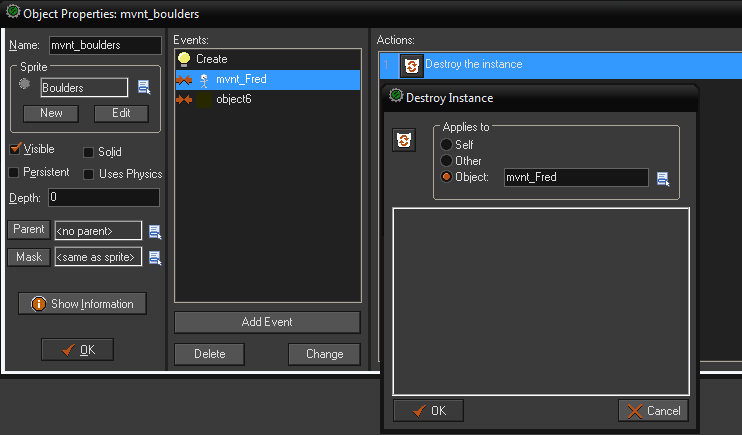
3.) Collision with wall.
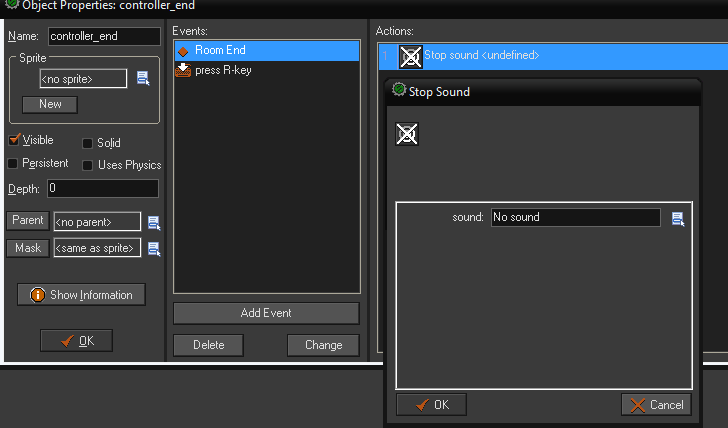
The next thing I did for this week was inputting the sound into my game. This part was actually quite easy, but had some trouble at first on where to start and stop the sound. I finally figured that part out and am happy about it. Here are a few pictures I took along with their respective short detail on how I did just that.
1.) Sound playing after the player hits any key to start the game.
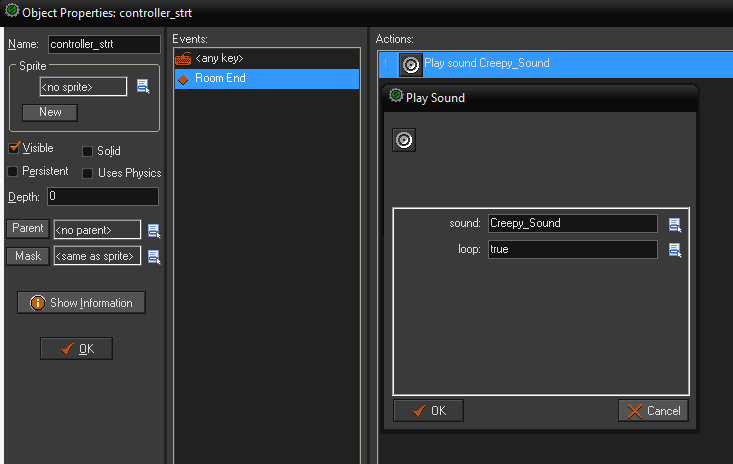
2.) The sound will continue to loop through the game until the player reaches the end. Here is how I made the sound to stop playing once the player beat the game.
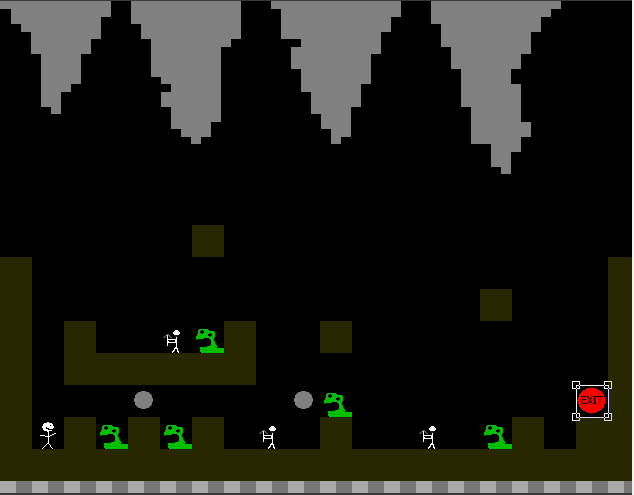
Now that I have all of the enemy movements created, I then created 3 rooms that I think will be challenging. The player can shoot down the enemies with unlimited bullets and try to reach the end of each level by hitting the red exit symbol. Here are the pictures of these challenging rooms that I had a lot of fun creating:
Here is the outcome of Level 1 (Changes may vary):

Here is the outcome of Level 2 (Changes may vary):

And finally, the outcome of Level 3 (Changes may vary):
Here is how the player will be congratulated after the completion of the third and final level:

The player has the option to play the game again by pressing the “R” button or can simply exit by closing out the game by hitting the red x button on the top right corner of the game.
Those are all the things I have been working on during the past week. Next week, I might make some slight changes in the outcome of each level or just one or two of the levels. It all depends on how fully satisfied I am on them.
Job Hunting Plan via Social Media
These are the main Social Media sites I use:
- WordPress
For job hunting purposes, I would use all four of these because I am used to their navigation and a few of these are most widely used to grab attention.
Three Steps for Job Prospects in Social Media:
- Adding information about school in your profile.
- What was your gpa.
- Your favorite class.
- Degree you achieved.
2. Displaying certain skills you have in your profile.
- Highest skill to lowest skill.
- What skill you want to expand upon.
3. Linking your account to local or widespread businesses.
- Might be interested in your blog posts.
- Be respectable with your posts when following businesses.
Week 10 of Capstone Project
This week I worked on creating a more controlled movement for my miner character, created solid walls for more challenge and to have it stop the bullets, and an exit portal to advance to other stages. I will first talk about the miner’s movement in a collision with the solid wall object. I’ve tried to have them move left and right without any solid object being there, but it looked like that was the only way for me to accomplish that. Here is a pic of how I setup the wall properties:
First, I had to create a new object for the wall, which is named “object6”.

Next, I went into the miner’s properties to create a collision with the wall event and registered a bounce off wall effect for the miner’s to hit.

For the miner’s movement, I had a little help with a specific source to get me through this process. Here is a link that I referenced for help:
Thanks to that helpful resource, I was able to have my miner’s move in the direction I wanted them to. This will be the same case with all of my other enemy objects in the game, but with different movements. Here is a pic of how I managed to make my character move left and right:

The next thing was having the wall object be able to stop bullets when the main character fires them. Since I have already made the wall object, I just went into the wall properties to create a collision event with the bullet and registered a destroy instance action to stop the bullets from continuing on. Here is a pic of how I did just that:

The last thing I did for this week was making an exit object in order for the character to be transported to the next stage. This was another instance where I could not accomplish it alone so, I researched this similar task until I found this helpful tutorial video on YouTube. Here is the link to that very video:
Here is also a pic as to what I did, with help of the video, to make the exit portal function:

That is all I did for this week. Next week should be the final week to work on more property settings for the other objects and creating more levels for the game as well as the end credits.
Social Games/ Virtual Goods – Before
Meaning of Virtual Goods:
Virtual goods mean the purchase of an item or specific goods in an online game.
Have I or Would I Use Virtual Goods?
To answer both of those questions, I have not used virtual goods before nor will I ever use virtual goods for an online game. I have seen pop-ups of these suggestions before while playing some Facebook games and they are not something I would be eager to accept anytime soon.
Why Will I Not Use Virtual Goods?
The use of purchasing goods with real money to be used in social games is completely wrong. I truly think that it is a waste of money to throw into all of those social games. It is just another gimmick for Facebook or any other social networks that do this sort of thing to gain more money.
Examples:
For the game, Draw Something, it gives you the option to purchase more colors and bombs to destroy letters.
For the game, Mafia Wars, you can acquire more territories by purchasing specific requirements.
 (found this image at ChinaSocialGames.com)
Test Run
Here is a YouTube link to my video game test run. I still have some more things to tweak before it is completely finished.
Week 9 of Capstone Project
Last time, I was having trouble trying to run my game in the program and this is the code that executed:
Saving IFF file… C:\Users\Zach Tarbell\AppData\Local\Temp\gm_ttt_68501\Capstone Project.win
Writing Chunk… GEN8
Writing Chunk… OPTN
Writing Chunk… EXTN
Writing Chunk… SOND
writing audio file C:\Users\Zach Tarbell\AppData\Local\Temp\gm_ttt_68501\Creepy_Sound.mp3…
Writing Chunk… SPRT
Writing Chunk… BGND
Writing Chunk… PATH
Writing Chunk… SCPT
Writing Chunk… FONT
Writing Chunk… TMLN
Writing Chunk… OBJT
Writing Chunk… ROOM
Writing Chunk… DAFL
Writing Chunk… TPAGE
Writing Chunk… CODE
Writing Chunk… VARI
Writing Chunk… FUNC
Writing Chunk… STRG
Writing Chunk… TXTR
0 Compressing texture… writing texture texture_0.png…
Writing Chunk… AUDO
Writing Chunk… SCPT
Writing Chunk… DBGI
Writing Chunk… STRG
Asset Compile finished: 10:25:29 PM
———————————————————–
executing C:\Users\Zach Tarbell\AppData\Local\Temp\gm_ttt_68501\Capstone Project.win
———————————————————–
“C:\Users\Zach Tarbell\AppData\Roaming\GameMaker-Studio\Runner.exe” -game “C:\Users\Zach Tarbell\AppData\Local\Temp\gm_ttt_68501\Capstone Project.win”
RunnerLoadGame: C:\Users\Zach Tarbell\AppData\Local\Temp\gm_ttt_68501\Capstone Project.win
#########################################################################
####!!!!$$$$$$ pwd – C:\Users\Zach Tarbell\AppData\Local\Temp\gm_ttt_68501
#########################################################################
RunnerLoadGame() – C:\Users\Zach Tarbell\AppData\Local\Temp\gm_ttt_68501\\Capstone Project.win
Checking if INIFile C:\Users\Zach Tarbell\AppData\Local\Temp\gm_ttt_68501\/options.ini Exists
!!!!No INI File C:\Users\Zach Tarbell\AppData\Local\Temp\gm_ttt_68501\/options.ini
Process Chunk: SCPT 84
Process Chunk: DBGI 972
Process Chunk: STRG 1403
Reading File C:\Users\Zach Tarbell\AppData\Local\Temp\gm_ttt_68501\\Capstone Project.win
Loaded File C:\Users\Zach Tarbell\AppData\Local\Temp\gm_ttt_68501\\Capstone Project.win
IFF wad found
Get Resolution
Get Header Information
InitGMLFunctions
HighScore..filename = C:\Users\Zach Tarbell\AppData\Local\Capstone Project\\hiscore.dat
Reading highscore file
Finished reading highscore file = 00278c10
Free previous name = 0027f1b0
Alloc new name = 9
name is = <nobody>
Free previous name = 0027f1d8
Alloc new name = 9
name is = <nobody>
Free previous name = 0027f200
Alloc new name = 9
name is = <nobody>
Free previous name = 0027f228
Alloc new name = 9
name is = <nobody>
Free previous name = 0027f250
Alloc new name = 9
name is = <nobody>
Free previous name = 0027f278
Alloc new name = 9
name is = <nobody>
Free previous name = 0027f2a0
Alloc new name = 9
name is = <nobody>
Free previous name = 0027f2c8
Alloc new name = 9
name is = <nobody>
Free previous name = 0027f2f0
Alloc new name = 9
name is = <nobody>
Free previous name = 0027f318
Alloc new name = 9
name is = <nobody>
finished reading HighScores!!
Game..Math..Graphic..Action..File..Resource..Interaction..3D..Particle..Misc..DS..Sound..DPlay..Physics..Gamepad..Buffers..Networking..YoYo..Fini
Code_Load()
VARI_Load()
ID_STRG
Create Window
AdjustWindowRectEx
RegisterClassEx
CreateWindowEx
Init Graphics
GR_D3D_Init()
Enable DwmEnableMMCSS
Create D3D9Ex interface
Enumerate Adapters
Selected Resolution: 640×480
Get Current Desktop Display Mode
Prepare to create device
Creating D3D device – ARGB=32bit, D24S8, SwapEffect=Copy, Hardware vertex processing
Creating screen render target
Get Device Caps
Graphics initialisation end…
Background_InitTextures()
Sprite_InitTextures()
Font_InitTextures()
IO Init
Process Messages
Splash!
SPLASH :: Start Frame
SPLASH :: Draw Clear
SPLASH :: DrawLogo
Compile finished: 10:25:40 PM
Now, thanks to a source I got off of YoYogames.com I finally fixed the issue and can now execute the game with no trouble. Here is the process I did to fix the issue:
1.) Went to the “File” tab in the top menu screen.

2.)
Clicked on “Preferences”.
3.)
Selected “Enable asset compiler caching”

Also, I was struggling with another issue the last time which was trying to upload a video on YouTube to show what I did last week. Well, that has also been resolved by converting the .avi file to .mov and that seemed to have worked. Here is the link to the late responding video of setting up my character’s movements in the program:
Main Character’s Movement Settings
I am actually going to hold off showing you the actual running of the game until I get a few more things accomplished.
Rough Draft of Final Project Paper
Here is a rough draft of my Capstone project paper:
Week 8 of Capstone Project
This week, I started to work on making the main character have shooting abilities to fight off the couple out of the three various objects which are, the blobs and the miners. I have tried countless of times trying to figure this stuff out by myself, but it was not enough and I needed to do more research on how to make these types of instances function correctly. I have found another helpful resource on YouTube that showed me a step-by-step process on how to create these events. Here is the link to that YouTube video I referenced: http://www.youtube.com/watch?v=PI29bLNdjwE
Here are a few steps along with screen shots that I took to accomplish this objective:
1.) Creating a new Sprite and naming it:

2.) Putting the new Sprite inside the Objects folder:

3.) Creating a key event along with its proper properties:
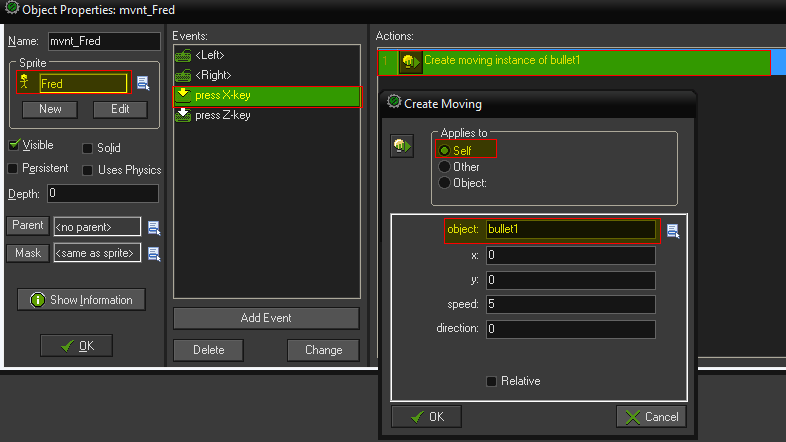
4.) Lastly, made the object, bullet1, destroy the bad guys:

I have also worked on making the good guy character’s ability to jump. The problem with working with the character’s and object’s functions is to keep trying until you get the correct event to work the way you want it to. After the many trial and error problems, I have finally figured out the type of jumping function the main character needed to have thanks to yet another video source: http://www.youtube.com/watch?v=SxvvEBOLWh0
Could not upload video to here or any other site such as YouTube due to unexpected errors. Am also having trouble trying to run the game in the Game Maker Studio program, but is also giving me a hard time on how i’m progressing. Will try to fix the errors as best I can.
Week 7 of Capstone Project
This week I have been working on the start up screen for my game, but am having some minor difficulties with that. I have looked up some resources on how to go about solving this issue, but no luck as of yet. Here is the link of the website that I have followed to go about creating a simple start up screen: Digital Worlds.
Here’s what my title screen looks like once you start up the game:
I have chosen this type of style and color from a website called, CoolText.com. The main reason I chose this particular piece was because it fit the environment of my game.
After re-reading the forum a few times, I have finally learned how to solve the issue. Here are some image captures I have taken to show you the steps I have taken to solve it:
1.)

Noted in the article I have distributed above stated that in order for an action to be performed in the title screen, you had to input another object. The newly created object does not need to have a sprite created or inputted in the object properties. Just insert an action, which in my case have chosen the keyboard option in which I have embedded the “any key” option for that event. I have shown you, in my earlier blog, the many tabs and attributes within those tabs to choose from. I have chosen the “Go to next room” attribute to be set as an event for when the user presses any key on the keyboard to then go to the first stage of the game.
2.)
The above image shows the two rooms I have created to get me started for the “Rooms” part of the game. The “start_room” file will be the first one to be executed, obviously, and then after the event has been operated by the user, it will then go to stage one room next.
3.)
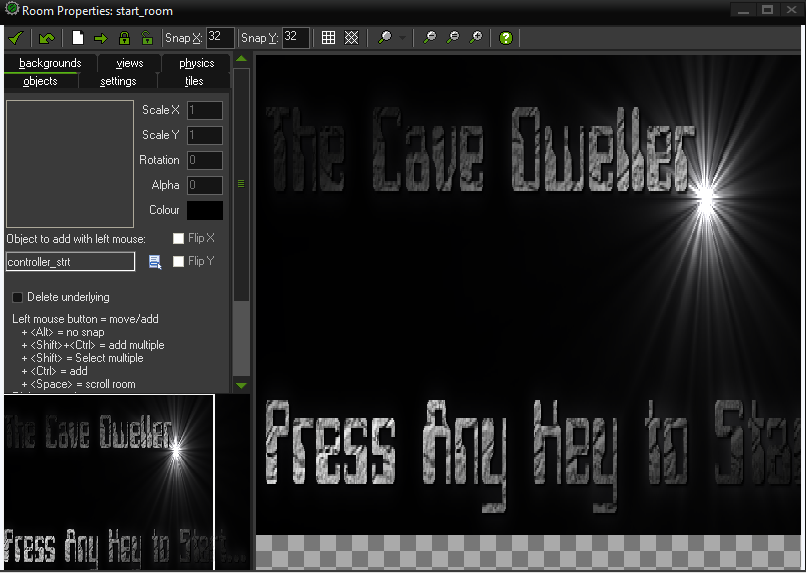
Here is where I started having some issues. In the objects section of the room properties of my “start_room” file, I had to insert the object I have ingeniously named, controller_strt in order for the function to actually work.
